How to build an MCP server in Python and TypeScript
Build an MCP server using Python and TypeScript. This technical guide covers the connection lifecycle, FastMCP, tool registration, and Streamable HTTP.
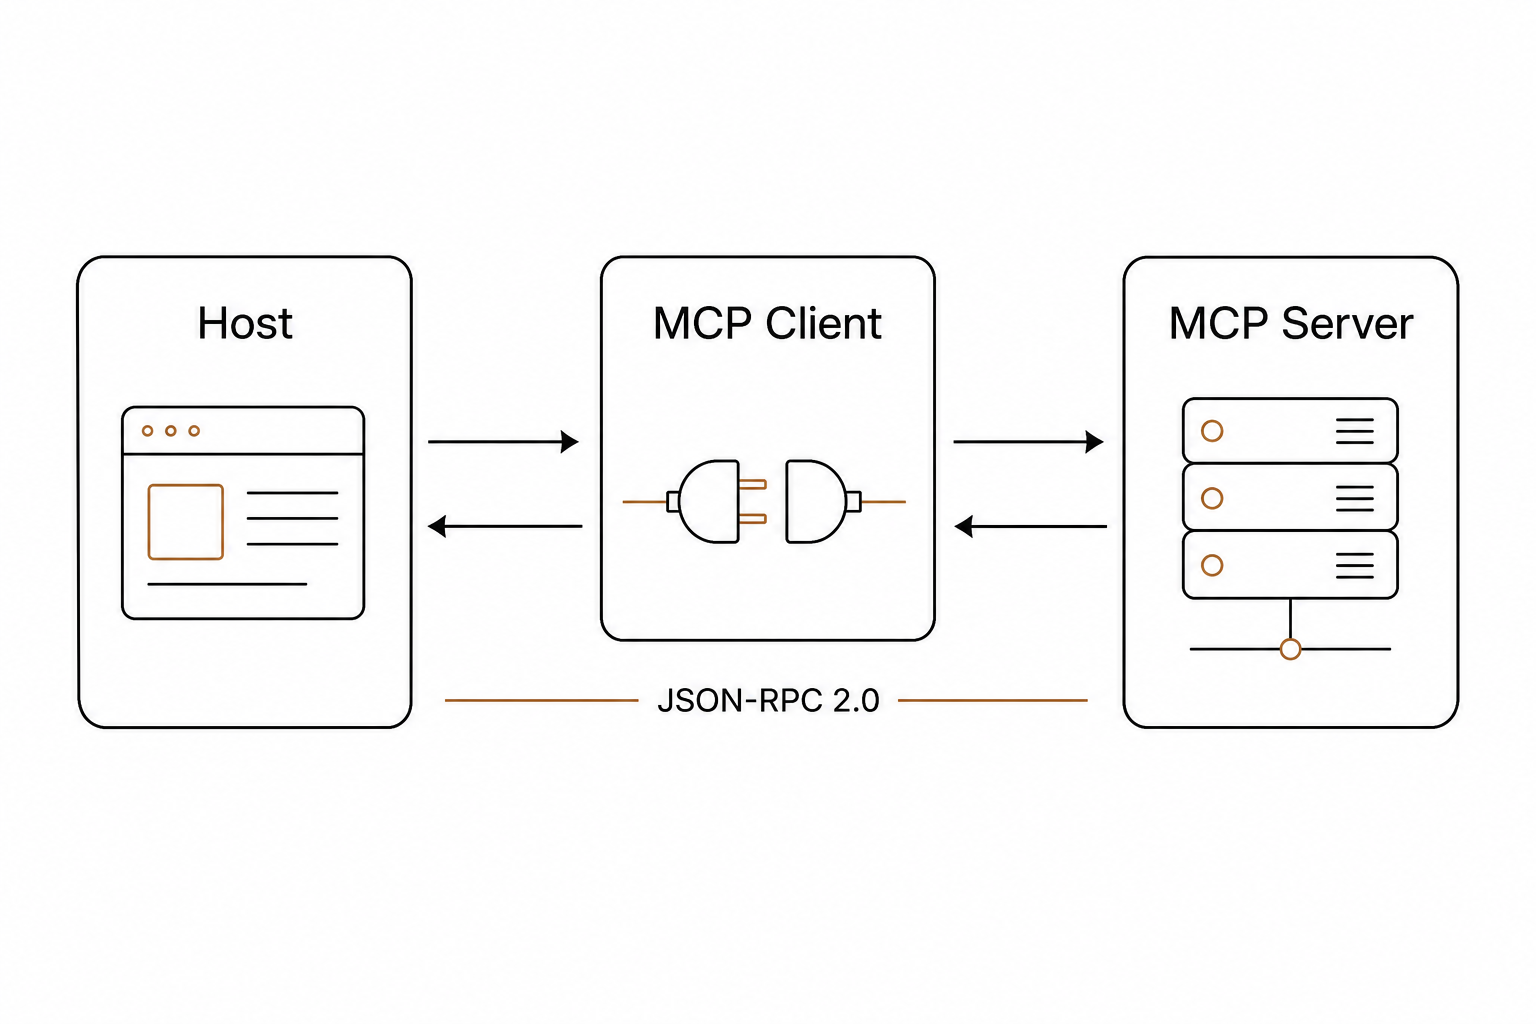
Connecting large language models (LLMs) to external data sources and execution environments has historically required a fragile web of custom integrations. Every new API meant writing a unique, bespoke adapter. The open-source Model Context Protocol (MCP) standardizes this connection, functioning like a universal USB-C port for AI tools and data sources.
Building an MCP server is the cleanest way to make your systems safely agent-callable. Whether you are exposing a local script or a production database, this guide walks you through the architecture, setup, and code patterns required to build your own server.
The architecture of an MCP server
To build a reliable integration, you must understand how the protocol coordinates communication. MCP operates on a stateful, bidirectional client-server architecture with three distinct roles:
- Hosts: The LLM applications, such as Claude Desktop or enterprise developer tools, that initiate connection sessions.
- Clients: Internal software connectors inside the host application that manage active protocol communication.
- Servers: Lightweight services that supply tools, resources, and prompt templates directly to the client.
The protocol separates its responsibilities into two distinct structural layers:
- The Data Layer: Employs UTF-8 encoded JSON-RPC 2.0 messages. This layer handles three types of messages: Requests (which require a unique ID and a response), Responses (which return results or errors), and Notifications (one-way messages requiring no response).
- The Transport Layer: Handles the underlying byte stream. The specification defines two standard transport mechanisms:
stdio(standard input/output, ideal for local process-to-process communication) and Streamable HTTP (which utilizes POST requests and Server-Sent Events for remote, network-based environments).
The connection lifecycle
Before any tools or data can be exchanged, the client and server must complete a strict, three-phase connection lifecycle:
- Initialization: The client initiates the handshake by sending an
initializerequest. This payload lists the client’s protocol version, its capabilities (such as sampling support), and client implementation details. - Capability Negotiation: The server responds with its own supported protocol version and lists its capabilities, such as whether it supports tool execution, read-only resource subscriptions, or prompt templates.
- The Operation Phase: Once both parties agree on a version, the operational phase begins. Both parties must respect the declared capabilities. Features not explicitly negotiated during initialization cannot be invoked during the active session.
How to build an MCP server in Python
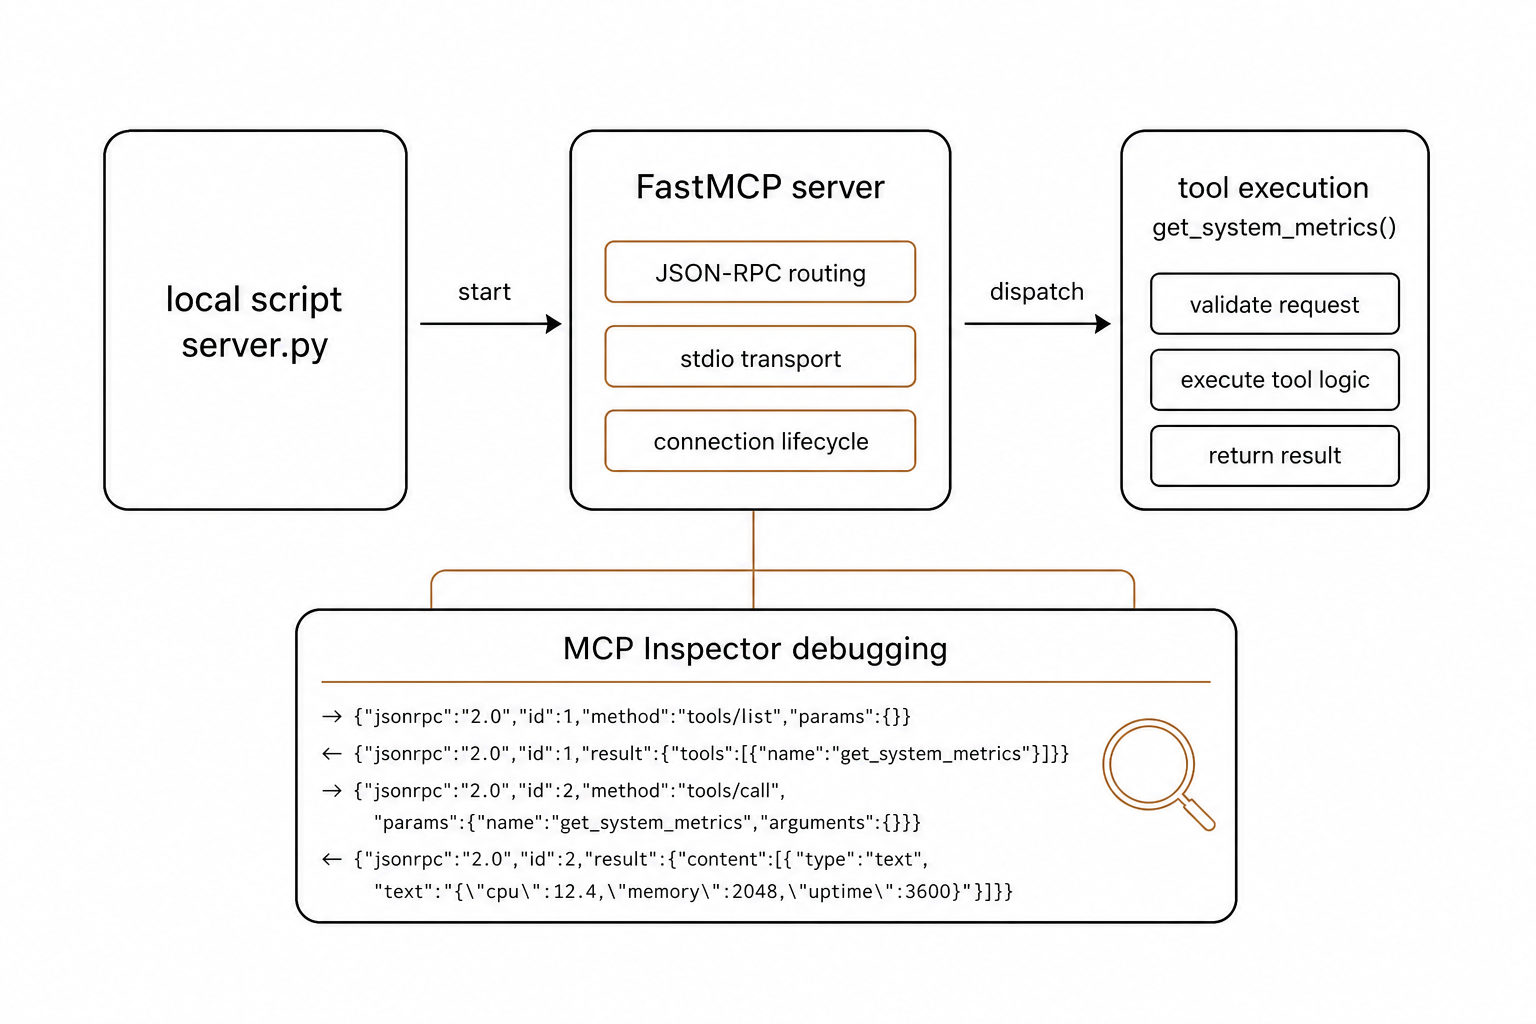
The official Python SDK provides a high-level framework called FastMCP. It handles JSON-RPC routing, transport configurations, and connection lifecycles automatically.
Set up your Python environment
The SDK recommends using Python 3.10+ with uv to manage dependencies and virtual environments cleanly. Initialize your project by running the following commands in your terminal:
uv init system-monitor-mcp
cd system-monitor-mcp
uv add "mcp[cli]"
This installs the required official Python SDK along with the developer command-line tools.
Write the server application
Create a file named server.py. In this file, import FastMCP, initialize the server with descriptive metadata, and define a custom tool using the @mcp.tool() decorator:
# server.py
import psutil
from mcp.server.fastmcp import FastMCP

# Initialize the server with a descriptive name
mcp = FastMCP("System Monitor")

@mcp.tool()
def get_system_metrics() -> str:
    """Retrieve real-time CPU and memory usage statistics from the host system."""
    cpu_usage = psutil.cpu_percent(interval=1)
    memory = psutil.virtual_memory()

    return (
        f"System Status:n"
        f"- CPU Usage: {cpu_usage}%n"
        f"- Memory Usage: {memory.percent}% ({memory.used // (1024**2)}MB used)"
    )

if __name__ == "__main__":
    # Use the stdio transport mechanism for local execution
    mcp.run(transport="stdio")
Debug with the MCP Inspector
Testing an MCP server using Claude Desktop can be slow and tedious. Instead, use the MCP Inspector CLI tool to spin up an interactive development environment:
mcp dev server.py
This command mounts your local code and opens a web interface. You can view raw JSON-RPC payloads, trigger the get_system_metrics tool, and verify that your output formatting complies with the protocol specifications.
Going production-grade with TypeScript and Streamable HTTP
While stdio is excellent for local testing, running an AI agent in the cloud requires exposing your MCP server over the network. This is where Streamable HTTP becomes necessary.
For production-grade, remote MCP servers, developers often turn to TypeScript. The @modelcontextprotocol/sdk allows you to bind your MCP server to an HTTP transport, using an Express server or Fastify backend to route JSON-RPC requests via Server-Sent Events (SSE).
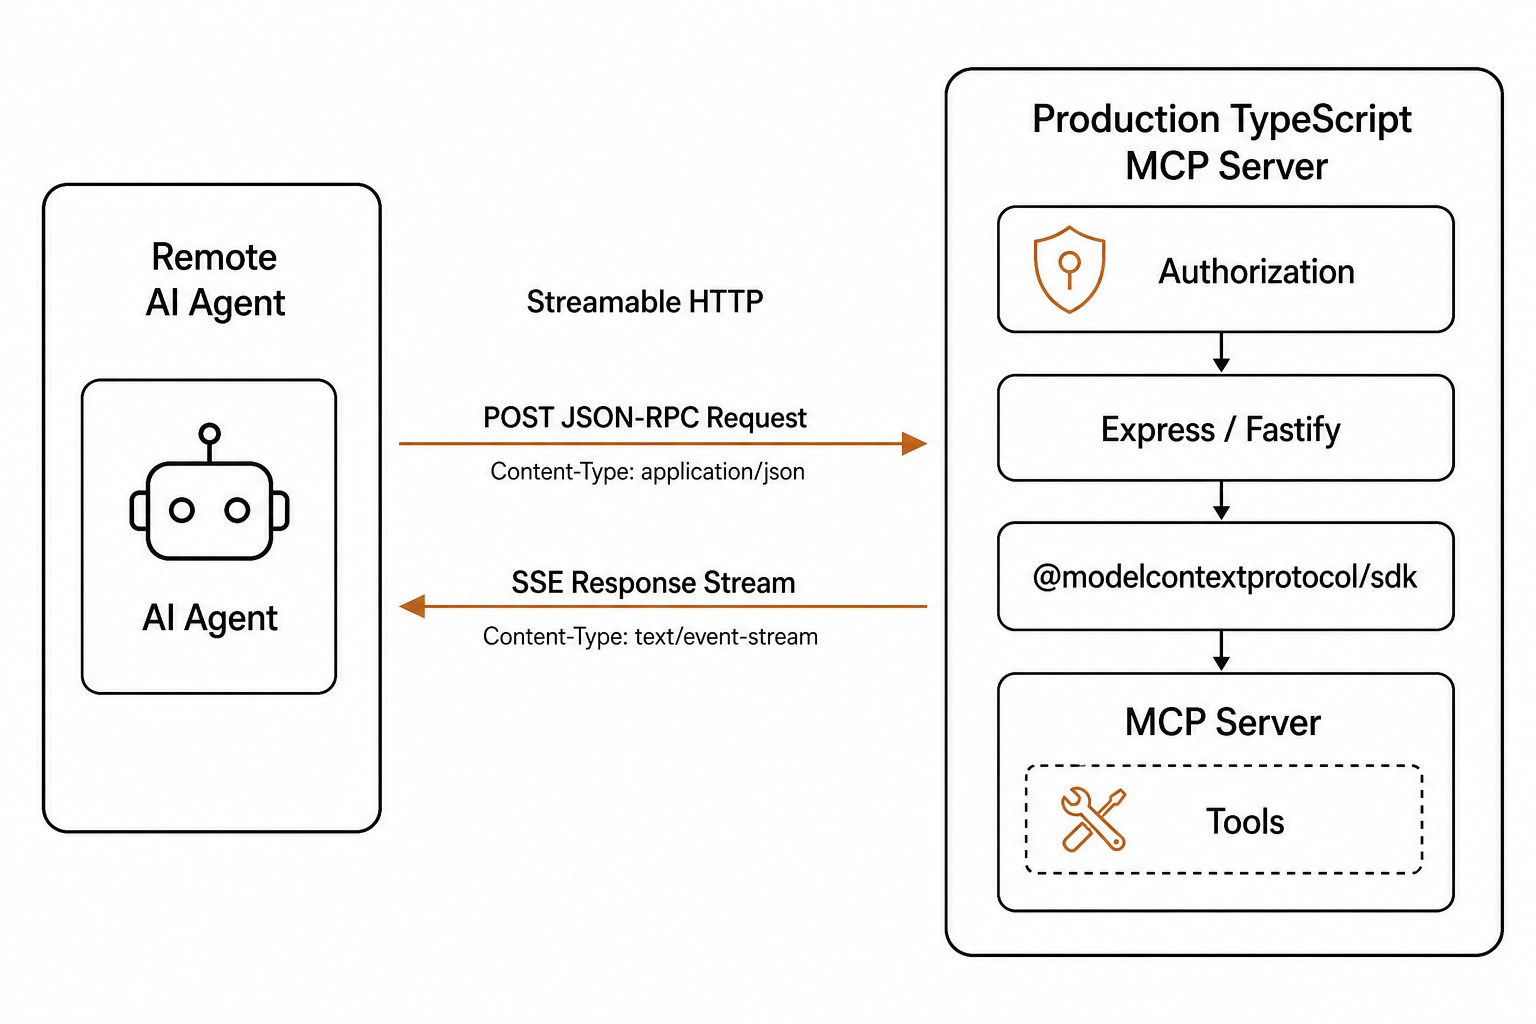
Below is the architectural pattern for registering type-safe tools in TypeScript using registerTool and Zod schemas:
import { McpServer } from "@modelcontextprotocol/sdk";
import { z } from "zod";

const server = new McpServer({
  name: "pricing-engine",
  version: "1.0.0"
});

// Register tool with runtime schema validation
server.registerTool({
  name: "calculate_tax",
  description: "Calculates regional sales tax for an order amount.",
  inputSchema: {
    type: "object",
    properties: {
      amount: { type: "number", description: "The order subtotal in USD" },
      zipCode: { type: "string", description: "5-digit shipping ZIP code" }
    },
    required: ["amount", "zipCode"]
  },
  handler: async ({ amount, zipCode }) => {
    // Implement database lookup or third-party tax API call here
    const taxRate = zipCode === "90210" ? 0.095 : 0.0825;
    const tax = amount * taxRate;

    return {
      content: [{ type: "text", text: `Calculated Tax: $${tax.toFixed(2)}` }]
    };
  }
});
Using Zod schemas ensures that any invalid parameters sent by the LLM are rejected with clear, standardized validation errors before reaching your underlying business logic.
Security and operational guardrails
Exposing databases, APIs, and file systems to autonomous LLMs introduces real security risks. When deploying your server, you must implement strict security layers.
Maintain a human in the loop
For read-only operations, auto-execution is safe. But for state-changing or high-risk actions – such as modifying a system configuration or executing a financial transaction – your host application must intercept the execution and require physical human approval. You can read more about balancing autonomous agents and risk management in our analysis of MCP vs function calling.
Implement token-based authorization
If your MCP server is exposed over Streamable HTTP, you must secure it. Do not rely on session IDs. Instead, utilize OAuth 2.1 with PKCE to authenticate incoming requests. Verify every transaction token to ensure the client has the authorized scope to run the requested tool.
Design structured state persistence
LLMs are stateless by default. For complex workflows requiring multiple steps, your server needs to track state outside of the prompt context. If your agent is processing multi-step operational tasks, use a centralized, atomic transaction ledger to prevent write conflicts. For a deep dive into state patterns, review our technical guide on architecting persistent memory for AI agents.
Utilize real-time event webhooks
If your system is stateful, actions taken outside of the LLM context (such as manual operator overrides) must sync instantly back to your ecosystem. Implementing highly resilient event-driven webhooks ensures your database and your agent's context window remain perfectly aligned.
Standardize your tool connectivity
Writing custom integration scripts for every new LLM framework is a losing battle. Building an MCP server allows you to write your integration once and instantly expose it to any client that supports the open protocol.
If you are developing AI applications for the restaurant and hospitality space, you do not need to build complex point-of-sale adapters from scratch. AgenticPOS provides a fully native, remote MCP server that exposes over 140 secure, agent-callable tools directly connected to Spindl – the leading all-in-one platform for modern restaurant operations.
Ready to connect your AI agents to real-world infrastructure? Start your 14-day free trial of AgenticPOS today.